Below are some of the questions we hear all the time.
Click to go the corresponding section: GENERAL CONTROLLERS ROTORS VALVES SENSORS
General:
Q: Where can I purchase Hunter equipment?
A: Creative Landscaping By Cow Bay Inc.
104 Harbor Road
Port Washington, NY 11050
(516) 883 8484
Q: This website only allows scheduling for irrigation services, but do you offer other services?
A: Yes! we offer all sorts of other services. Some of the services we offer include:
- Lawnmowing and cleaning
- Planting services
- We also offer general and commercial contracting. Visit our sister company to find out more! Click Cow Bay Contracting to learn more.
Controllers:
Q: What is needed for a complete Watering Program?
A: A complete watering Program consists of the following:
- Watering Start Time(s)
- Station Run Time(s)
- Water Days
On an active Water Day the controller will look for a Watering Start Time to start the cycle, then the controller will look for the station(s) with Station Run Times. Then the controller will run the stations in order, from the lowest numbered to the highest, one at a time until all stations in the program have watered.
Each Program requires only one start time to initiate a watering sequence of all the stations assigned to that program. Multiple start times may be used to facilitate more efficient watering if local conditions dictate.
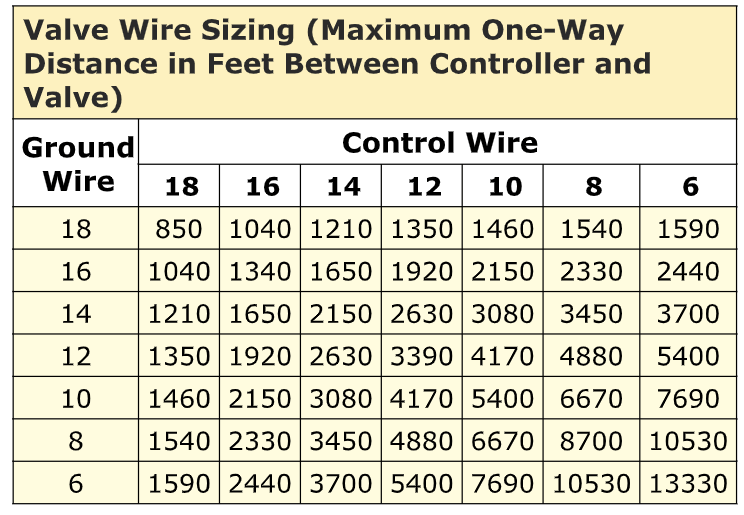
Q: What is the maximum distance I can run wire between the controller and the valves?
A: The answer really depends on the static water pressure of the irrigation system and the wire gauge you are using. Hunter Industries has provided a Valve Wire Sizing Chart to assist you with the correct wire size for your application.
Q: Why is the controller not starting the watering cycle?
- Check the Programming:
a. Is there a watering Start Time
programmed into the controller?
b. Is the Watering Start Time programmed
with correct time of day (i.e. AM or PM)?
c. Is today a Water Day? (i.e. Controller
may be set for Even Days and today is
the 21st)
d. Are there Station Run Times programmed
into the controller? - Is there a rain sensor wired into the controller?
Look at the “Sensor” terminals on the controller. If there are wires connected to the “Sensor” terminal screws, there is a
sensor on the irrigation system. By sliding the Rain Sensor switch to the “Bypass” position you can over-ride the active sensor. Look at the controller display, if the “Sensor OFF” icon is displayed, the sensor is activated and inhibiting the watering cycles. By sliding the Rain Sensor switch to the “Bypass” position you can over-ride the active sensor.
- Is the main irrigation water supply open?
Go to one of the irrigation valves and twist the solenoid 1/4 to 1/2 a turn counter-clockwise. If the valve opens and sprinklers turn on, your valve is working and you’ll need to check the controller and field wiring. If the valve did not turn on any of the sprinklers, the water to the valves is still off. Find the irrigation isolation valve and open it. - Is the controller station output 24VAC-28VAC?
Manually activate all the stations one at a time. Using your voltmeter, check the voltage at each station terminal screw when that station is active. If there is voltage in the range of 24VAC to 28VACon the station terminals, the controller is working correctly. If not, the controller or station module needs to be replaced. - Is there voltage on the station wires at the valve?
Manually activate all the stations one at a time. Using your voltmeter, check the voltage on each wire at the valve location when that station is active. If there is voltage in the range of 24VAC to 28VAC on the station wires, the wiring is good. If not, the wiring needs to be repaired or replaced.
If there is a minimum voltage of 19VAC on the station wiring at the valve and the valve operates manually, but still doesn’t activate using the controller, the solenoid may need to be replaced.
Q: What should I check if the controller has no display?
A: The first thing to do is to make sure there is power to the controller at the outlet where it is plugged in. Use a test lamp or any other 110VAC device to determine if there is voltage at the outlet.
If there isn’t power there, or if you have a controller that is hard wired, check the circuit breaker at the main breaker box.
If you have power at the outlet, the next thing to check is the transformer output. Use a voltmeter to check the voltage either on the two transformer wires or at the two AC screw terminals on the controller. The transformer should have an output in the range of 24VAC to 28VAC.
If the wall outlet has 110VAC and the transformer has no voltage output, you need to replace the transformer.
If you have voltage at both the wall outlet and the transformer output and you still have a blank display, try cycling the power on the controller.
To cycle the power on
Q: There is a rain sensor installed on my customer’s system, but it doesn’t interrupt the irrigation cycle. What should I check?
A: There are three possible reasons:
- The most common reason is because the sensor has NOT gotten enough rain to activate. Go out to the rain sensor and manually activate the switch. Do you hear it click? Did the sprinklers stop? If so, the rainfall on the sensor hasn’t reached the activation setting. (If you know that your rainfall has exceeded your rain sensor activation setting, you may want to consider moving the sensor to a different location.)
- The rain sensor switch is in the “BYPASS” or “OFF” position. To fix this, slide the switch into the “ACTIVE” position.
- During installation of the rain sensor, the terminal jumper was NOT removed. To fix this, remove the terminal jumper located on the sensor terminal screws.
Rotors:
Q: What tips can you give me to pass on to my service people concerning a rotary sprinkler that does not rotate?
A: Hunter rotary sprinklers operate on a “gear drive” system. When in operation, water turns a small turbine in the base of the sprinkler, which drives a series of gears that cause the head to rotate. The Hunter gear drive mechanism is
sealed from dirt and debris; however, even our sprinklers will get the occasional particle of contamination within.
If the sprinkler is no longer rotating and the water flow coming out of the sprinkler has decreased, you can first try cleaning out the filter by removing the pop-up assembly from the main body. The cap can simply be threaded off and the internal assembly removed. The filter on the bottom of the internal assembly can be easily removed using needle nose pliers. Generally, if cleaning the filter does not solve non-rotation then the internal sprinkler assembly must be replaced.
Q: What tips can you give me to pass on to my employees concerning rotary sprinklers not popping up?
A: Loss of zone water pressure is the reason for rotors not to pop up.
- Problem: Broken zone piping will cause loss of pressure. Look for new trees and shrub plantings, new or repaired fences–these are a common cause for broken pipes.
Solution: Repair the broken pipe. - Problem: Excessive flow-by on the rotors will cause loss of pressure. Flow-by is the water that flushes out when the rotor first starts to pop up. Hunter rotors are designed to have zero flow-by.
Solution: Replace the riser seal and spring seat on any older rotors that may have worn seals.
Valves:
Q: What do I need to check when a closed valve continuously leaks water?
A: Here are two reasons why when the valve is shut off it could continue to leak water:
- The most common reason is called “low head drainage” this is when the lowest head on the zone drains the water from the lateral piping out through the sprinkler. This is actually not a leaking valve, but the effect of gravity on the water in the piping system. If you are experiencing low head drainage, it will stop after all the water has drained out of the pipes. A solution would be to install check valves, such as the HCV , in the sprinklers.
- If water is leaking through the valve, there is most likely debris in the valve that will not allow it fully close. To fix this, you’ll need to disassemble the valve, rinse all the parts with clean water and re assemble the valve. (A check valve in the sprinkler will not fix this type of leak.)
Q: Why do some valves close so slowly?
A: Most irrigation valves are designed to close within 10 to 20 seconds of the solenoid deactivating. The most common reason why a valve would close slower is that there is a restriction in the valve metering port(s). Hunter
valves incorporate the metering ports in the diaphragm assembly. In the plastic center of the diaphragm assembly, there are small holes that meter (restrict) the amount of water that can flow to the top of the valve. If debris clogs these
holes, the flow is restricted too much and the valve can either close real slow or stay open indefinitely. To fix this, simply replace the diaphragm assembly.
Sensors:
Q: How do I connect a rain sensor to a Hunter controller?
A: On Hunter controllers you’ll see separate screws on the terminal strip designated for sensor connection. The designation should be either “SEN” or “RS”. This rain sensor circuit requires a normally closed type switch to operate correctly.
To install a Mini-Clik® , Rain-Clik™ , Freeze-Clik™ ,Wind-Clik™ or the Mini -Weather Station sensors to a controller, simply remove the jumper that is connected to the sensor terminals. Then, attach one of the sensor wires to either of the sensor terminals on the controller. Attach the other sensor wire to the other sensor terminal on the controller.
To install a Wireless Rain-Clik™ sensor to the controller, simply remove the jumper that is connected to the sensor terminals. Then, attach the BLUE sensor wire to either of the sensor terminals on the controller. Attach the WHITE sensor wire to the other sensor terminal on the controller. The two YELLOW sensor wires are for the 24VAC power. Attach one of these YELLOW sensor wires to either of the controller terminals marked “AC” and attach the other YELLOW sensor wire to the other controller terminal marked “AC”. (You will not use the ORANGE wire)
Q: How long does it take for the rain sensor to dry out?
A: All Hunter rain sensors have an adjustable “Vent Ring”. The drying out time could be as little as 4 hours depending on the weather conditions (temperature and humidity) and how the vent ring is set. If the weather conditions remain cold and damp, your sensor could be active for months.
Q: Why is the rain sensor not turning off the sprinklers?
A: There are three possible reasons:
- The most common reason is because the sensor has NOT received enough rain to activate. Go out to the rain sensor and manually activate the switch. Do you hear it click? Did the sprinklers stop? If so, the rainfall on the sensor hasn’t reached the activation setting. (If you know that your rainfall has exceeded your rain sensor activation setting, you may want to consider moving the sensor to a different location.)
- The rain sensor switch is in the “BYPASS” or “OFF” position. To fix this, slide the switch into the “ACTIVE” position.
- During installation of the rain sensor, the terminal jumper was NOT removed. To fix this, remove the terminal jumper located on the sensor terminal screws.
